|
Generic Imports |

|

|
|
|
Generic Imports |
|
|
Generic Imports
|
Generic Imports |
|
|
|
|
Generic Imports |
|
|
Generic imports gives you the possibility of importing data from old legacy applications or other data sources into the Captools/net database. It is initiated from the Tools sub-menu:
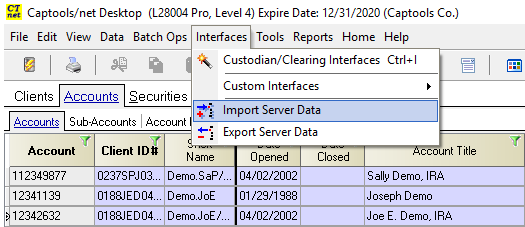
This takes you to a browser import form because the import process can be most efficiently done on the server. The import controls, similar to the following, (depending upon the applicable destination data table) allows you to either use an existing template for the import, or to set up a new template. The template allows you to map the data fields to the Captools/net data structure and also permits you to specify filters to limit the imported data to a subset of the source data.
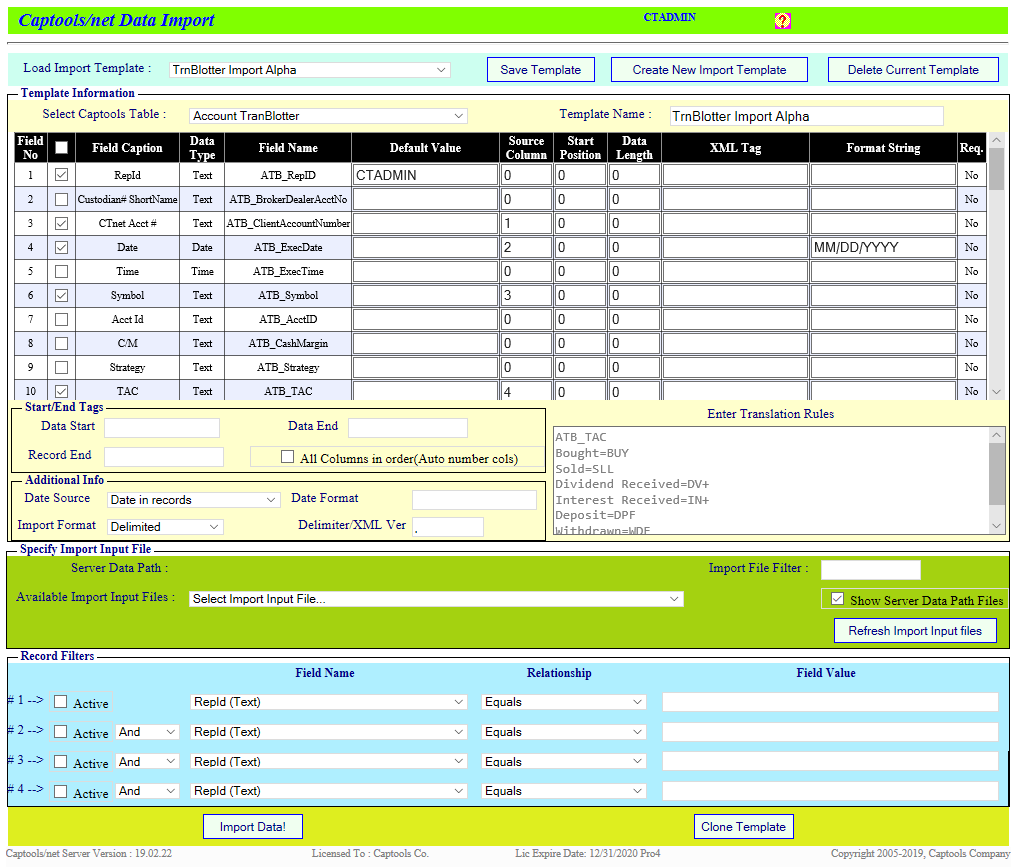
Default Value
What ever value is placed in this area is used in the destination field if the source data file contains no data for this field.
Source Column
This specifies the position of the source data in a delimited source file.
Start Position and Data Length
These specify the start position and field length of the source data when the source data is not delimited.
XML Tag
This specifies any applicable XML tag for the field in the source data. XML capability is currently not active.
Format String
This field can be used to specify the format for date conversion, using the notation "MM" for months, "DD" for days, and "YYYY" (or "YY") for years, separated by the operative separator (e.g. "/" or "-") or no separated. If "MMM" is used, the months in the source data are assumed to be represented by the first 3 characters of the month name, e.g. "Jan" for January.
If a non-date field is being translated, the "Format Field" can optionally contain the specification "@=" to specify where the source data is to start and/or ";=" (semi-colon equal) where the source data is to end. For example if the source data field says "Jones Account#12345", and you only want to import the number portion, you would put "@=#" in the Format field if you only wanted to import the number "12345", or you could specify ";=Account" if you only wanted to import "Jones".
Sign - Placing a "-" (minus) sign in the first character of the Format field of a numeric field specification will act to reverse the sign of the imported numeric data.
Factor - A factor can be applied to an imported number field by placing the notation such as "x0.01" in the format field to multiply the imported number by a fixed factor.
Allow Spaces - Placing the notation "ALLOWSPACES" in the Format Field of a ticker symbol import will prevent an underline being inserted in lieu of a space character.
Long Option Symbols - If the Format field is associated with importing a security symbol and the notation "SYMB" is placed in the field, the specification will cause any symbol greater than 15 characters to be "compressed" to fit into the 15 character limit. A typical formatting notation for this field would be SYMB - YYYY MMM DD - ##.## T, where "SYMB" specifies the location of the symbol in the original data, "YYYY MMM DD" the
Translation Rules
These are primarily intended to translate transaction codes from the source data to the Captools/net codes. The first entry must indicate the field that is being translated, which is "PTR_TAC" if importing directly to the portfolio, or "ATB_TAC" if importing to the transaction blotter. The translation rules format is "source=destination". Modifiers can be used for conditional translations as follows:
"A" for Amount - Use curly brackets to specify the condition, e.g. "INT=IN+ {A>0} " This specifies that the source code "INT" is translated to "IN+" if the amount field is positive.
"Q" for Quantity - Use curly brackets to specify the condition, e.g. "TRADE=SLL {Q<0}" This specifies that the source code "TRADE" is translated to "SLL" only if the quantity is negative.
To end the translation rules for a field, use a string of asterisks, e.g. "***************"
The translation rules section may also contain some non-translation specifications as follows for transaction imports:
"CalcCommissions" - This specifies that commissions be computed as a "plug" figure from the Quantity, Amount, Price, etc which are in the import data. It also ensures that the price is not re-computed.
Start and End Tags
These items allow you to specify tags from where to start the import and end the import. These can be left blank if you want the import to start with the first data. The record end field usually will not be needed since a line of text data will be ended by an ASCII end of line character (ASCII #13).
Date Source - "Date in Record" (in Data) indicates that the date for each record is contained therein and will be imported as specified in the date field.
"'Date in File Header'" will import the date specified at the beginning of the file using the specification contained in the Date Format field. Thus if the Header record is "Positions 03/21/2010", then the Date Format field should contain "Positions@1, MM/DD/YYYY@11".
"Extract Date From File Name" will extract the date from the filename using the specification in the Date Format field. Thus if the filename is "AB20100325.POS" then the Date Format field should be "??YYYYMMDD.POS". If an invalid date is extracted the date of the file on the drive will be used.
Account in File Header - Some source files, typically downloaded from retail brokerage sites involve transactions or holdings for only a single account. This account number may be in the first line or two of data. In this case leave the "source" column set at "0" and place a notation such as "@=XXXX" in the "Default Value" field, where in this case "XXX" is assumed to immediately precede the account number in the header record. If the brokerage website obscures the first few digits of the account number e.g. with "XXXX" that will serve as a good marker for the location of the account number. If the full account number is in your account records, Captools/net will be able to match it with the trailing digits and thus import the full account number. If there is no consistent identifier for the account number, but it is always a fixed number of characters to the right in the header, you can used the notation, e.g. "keyword@1, acct#@70" to specify the correct header record line (the one with "keyword" at location) and the character position representing the position of the first account number character.
Additional Info/Import Format
It is important to specify if a source data file is delimited in this section, specifying the delimiter in the "Delimiter/XML ver" field.
Importing Using Existing Template
If you are using an existing import template, simply use the Load Template control to select the applicable template. Then specify the file to be imported from the available import files list.
This is a list of files which are already on the server in the import directory. If the file you want to import is not on the server, but is on your local computer, you can upload that file using the Upload New Import File function, to send a copy of the file from your computer to the server.
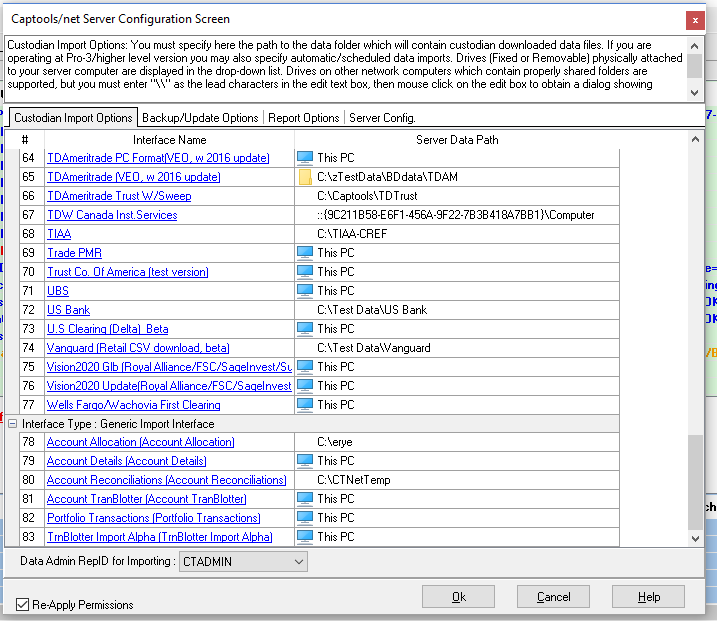
Specifying Import File Path: Alternatively you can specify the path to your import files Using the "Configure Options/Import Options" on the Captools/net Server Control Panel. Be sure to scroll down to the "Generic Import Interface" Section to find the template name for which you want to specify the "server data path". Drill down to the folder where your data file will be located. Lastly, check the checkbox at the bottom of the dialog to "Re-apply Permissions" to allow the software to read files from that location.
Once you have selected the desired import template and specified the desired import file, click the Import Data! button to initiate the import process. The time required to complete the import process will depend upon the amount of data. You can check the import progress by opening the import log file and periodically refreshing it until you see the Import Process done message. One of the advantages of this being a server side process is that you do not necessarily need to wait for the process to complete before moving on to other tasks. Thus if the import involves a lot of data, you could move on to importing other tables (i.e. select another table and import file) before the first import is complete.
Refreshing Captools/net Desktop - If your desktop program is open at the table you are importing at the time that you commence your import, you will need to click on the "Refresh" icon, before you will see the data in your data table:
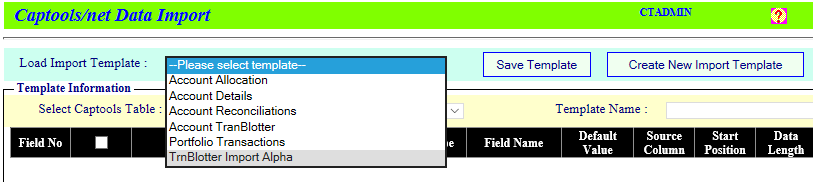
Creating a New Import Template
If a template does not yet exist for the data you need to import, you can create a new template, by specifying the desired table using the Select Captools Table control and clicking on the Create New Import Template button. Specify a name to be used for the template. This should be sufficiently descriptive that you will understand what the template is for in the future.
To complete setting up the template, you will probably need to open and examine the source data file to see what data fields it contains, in what order they appear and how they are delimited (generic imports assume that source data is organized such that a single line of text contains one record's worth of data). Once you have examined the source data, perform the following steps to complete the setup of the template:
1) Check the fields into which data will be imported.
2) Specify the column in the source file from which each checked field will derive its data. The first data item in a source file record is considered column #1, the data item after the first delimiter is column #2, the data item after the second delimiter is column #3, etc. If there is no delimiter in the source data, but rather the data occupies fixed positions, e.g. the symbol field starts at character position 15, then specify the applicable start position and length of each field in the "Start Position" and "Data Length" columns in the template for each checked field. If the data is neither delimited, nor fixed position, but rather is separated by a "tag" such as an XML tag, then you need to enter the tag in the XML Tag column for that field.
3) Specify Start and End tags, if any in the source file. A Start Tag is a word which identifies the start of relevant data in the source file and an end tag specifies the end of that data. Data occurring before or after the start and end tags respectively will not be imported.
4) Specify the Record End tag. This will only be necessary if the record end is not the end of a text line, or if the source record actually occupies multiple lines of text.
5) Specify the Import Format, either Fixed, Delimited, XML, or some predefined "Special" format. If the format is "Delimited" specify the delimiter character or characters in the adjacent "Delimiter/XML" specification. If the import format is XML, specify the XML version in this field. If the Delimiter is a "Tab" character, you need to put "#9" (without the quotes) in the delimiter field (#9 is the ASCII number for Tab).
6) Specify the Date Source and Date Format. Generally this will be "Date In Data", and the format will be specified in the field specification above. However in some cases such as import of prices for a single date, the date is not contained in the data, and needs to be specified by the user at time of import or extracted from the filename.
7) Create translation lists for any fields such as transaction TAC fields in the Enter Translation Rules text box. This is done by specifying the field name as it is listed in the template and then following it with a list of the translations in the form "B=BUY", with the left side being the source value and the right being the value to which it is translated in Captools/net.
8) Save the Template by clicking on the Save Template button. This ensures that the template will be available for future imports.
Imports of Data Contained in MS-Excel
Data held in Microsoft's Excel that you want to transfer to Captools/net needs to be exported to a "Comma-Separated Variable" (csv) format. However, it often is not sufficient that you simply use the Excel "File/Save As" function to save in CSV format. The reason for this is that Excel may not properly enclose text field in quotes with comma separators between such fields. Our suggested resolution to this is that you download Sun's Open Office spreadsheet product from www.openoffice.org and use this to export to a comma separated file. In our experience that product provides a properly formatted CSV output.